

The Subaru Ascent is equipped with a modern LATCH (Lower Anchors and Tethers for Children) system, designed to simplify the installation of child restraint systems while ensuring maximum safety. Using the LATCH system in the Subaru Ascent allows secure attachment without relying solely on seatbelts, improving stability and reducing installation errors.
Lower and tether anchorages
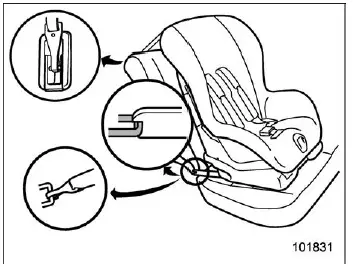
WARNING
- Always attach the child restraint system securely to the LATCH anchors
in the Subaru Ascent.
Before installation, make sure that no debris or foreign objects are present around the anchor points.
A properly secured system is essential, as incorrect installation may lead to serious injury or death during sudden braking, sharp maneuvers, or accidents.
- When installing a child restraint system in the Subaru Ascent using LATCH anchors together with a fastened rear seatbelt, ensure the seatbelt does not become entangled with the child restraint system or anchor hardware.
NOTE
The rear seatbelt reminder system in the Subaru Ascent may detect the presence of a passenger when a child restraint system is installed using LATCH anchors. This may activate the warning light and chime. To avoid this, fasten the rear seatbelt before installing the child restraint system.
In the Subaru Ascent, certain child restraint systems can be installed directly using dedicated lower and tether anchorages without using seatbelts. This LATCH system improves ease of use and ensures a more secure installation when properly applied.
Lower anchorages
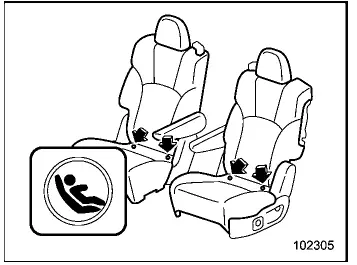
Second-row seat (captain seat)
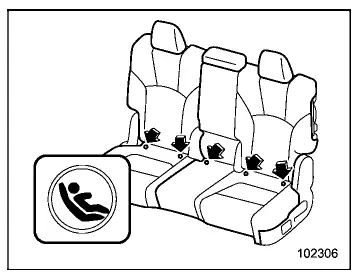
Second-row seat (bench seat)
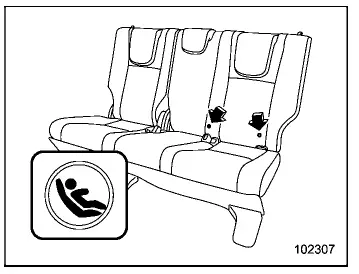
Third-row seat
WARNING
Never attach more than one lower hook to the same anchorage bar in the Subaru Ascent, as this may compromise the effectiveness of the restraint system.
The Subaru Ascent lower anchorages are located between the seat cushion and seatback in designated rear seating positions. These anchor points are specifically engineered to securely hold child restraint systems.
The second-row captain seats each feature two lower anchors, while the second-row bench seat provides multiple anchor points, including shared anchors for the left and center seating positions. The Subaru Ascent third-row left seat is also equipped with dedicated lower anchors.
Tether anchorages
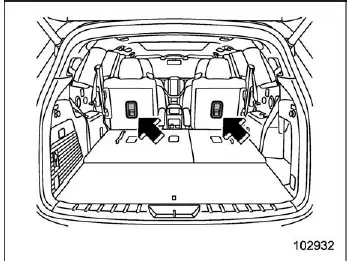
Second-row seat (captain seat)
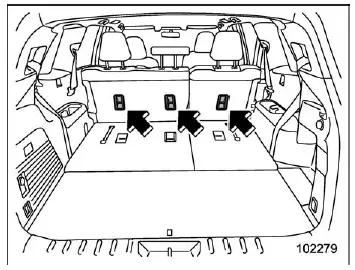
Second-row seat (bench seat)
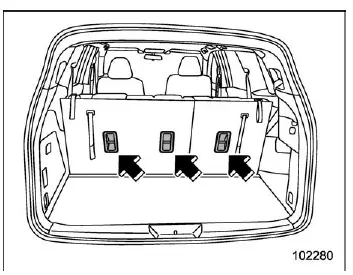
Third-row seat
The tether anchorages in the Subaru Ascent are positioned behind the rear seats as illustrated. These anchors are used to secure the top tether strap of a child restraint system, providing additional stability and reducing forward movement during a collision.
Always use the tether anchorage corresponding to the seating position where the child restraint system is installed in the Subaru Ascent.
To install a child restraint system using lower and tether anchorages
Follow these steps to correctly install a child restraint system using the LATCH system in the Subaru Ascent.
WARNING
Before installing a child restraint system in the Subaru Ascent, ensure that the seatback is securely locked in place. Failure to do so may result in serious injury or death during an accident.
1. If the Subaru Ascent seat includes a sliding function, move it as far back as possible to provide adequate installation space.
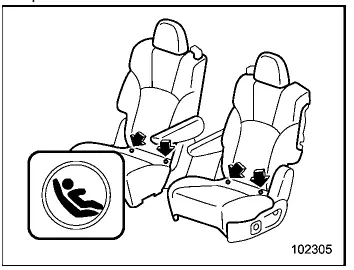
Second-row seat (captain seat)
Proper use of the LATCH system in the Subaru Ascent ensures reliable and secure installation of child restraint systems, enhancing safety for young passengers in all driving conditions.
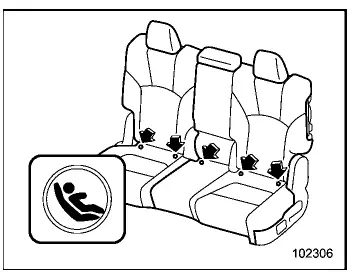
Second-row seat (bench seat)
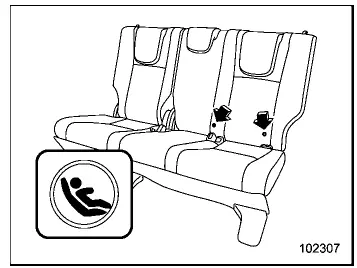
Third-row seat
2. In the Subaru Ascent, use the indicator symbols "
 "
to accurately locate the lower anchorages (bars). Depending on the specific Subaru
Ascent configuration, the placement of these symbols may vary slightly.
"
to accurately locate the lower anchorages (bars). Depending on the specific Subaru
Ascent configuration, the placement of these symbols may vary slightly.
Second-row seat
In the Subaru Ascent second-row seats, you will find markings "
 "
on the seat cushion. These marks clearly indicate the position of the lower anchor
bars. Each anchorage is positioned behind the lower portion of the seatback and
may be covered for protection.
"
on the seat cushion. These marks clearly indicate the position of the lower anchor
bars. Each anchorage is positioned behind the lower portion of the seatback and
may be covered for protection.
Third-row seat
In the Subaru Ascent third-row seats, similar markings "
 "
are located at the base of the seatbacks. These indicators show the exact location
of the lower anchor points used for secure child restraint installation.
"
are located at the base of the seatbacks. These indicators show the exact location
of the lower anchor points used for secure child restraint installation.
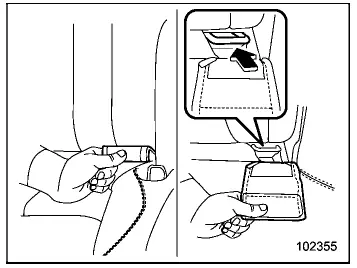
3. For the Subaru Ascent second-row seat, carefully pull away the anchorage cover from the selected side of the seatback to expose the lower anchor bars required for installation.
If the anchorage cover returns to its original position and makes installation difficult, press it firmly toward the seat cushion until it remains flat and out of the way.
4. If the child restraint system comes into contact with the head restraint in the Subaru Ascent, raise the head restraint fully. If interference persists, remove the head restraint to ensure proper positioning.
CAUTION
Always store any removed head restraint securely in the cargo area of the Subaru Ascent. Do not leave it inside the passenger compartment, as it may become a dangerous object during sudden braking or sharp maneuvers.
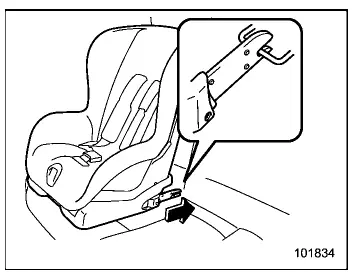
5. Following the child restraint manufacturer’s instructions, attach the lower
hooks to the anchor bars located at the "
 "
marks on the Subaru Ascent seatback base. Ensure that adjacent seatbelts are not
trapped or interfering with the installation.
"
marks on the Subaru Ascent seatback base. Ensure that adjacent seatbelts are not
trapped or interfering with the installation.
6. If a gap exists between the child restraint system and the seatback, adjust the seatback angle until firm and even contact is achieved.
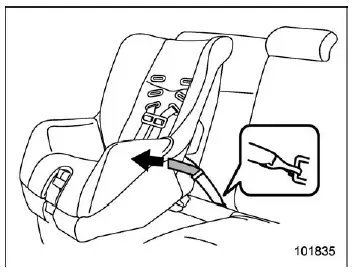
7. For flexible-type child restraint systems in the Subaru Ascent (those using tether straps), press the system firmly into the seat cushion and tighten both left and right lower straps to remove slack and ensure a secure fit.
8. Attach the tether hook to the designated tether anchorage located behind the Subaru Ascent rear seat and tighten it firmly to stabilize the upper portion of the child restraint system.
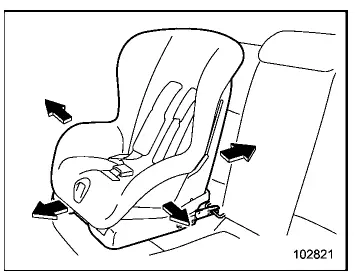
9. Before placing a child in the Subaru Ascent child restraint system, test its stability by attempting to move it forward, backward, and side to side.
The system should not move more than 1 inch (2.5 cm). Applying downward pressure while tightening the straps can improve stability and security.
10. To remove the child restraint system from the Subaru Ascent, simply follow the installation steps in reverse order.
Subaru strongly recommends that installation of a child restraint system in the Subaru Ascent be checked by a certified Child Passenger Safety Technician. In the United States, refer to the National Highway Traffic Safety Administration (NHTSA) for inspection locations. In Canada, consult Transport Canada resources.
Correct installation of child restraint systems using the LATCH system in the Subaru Ascent ensures optimal safety and protection for young passengers during every journey.
Related manual topics
Tire care - maintenance and safety practices
For reliable performance of your Subaru Ascent, inspect the tires ежедневно
or before each drive to ensure they are free from serious damage, embedded objects
such as nails or stones, and any visible defects. At the same time, carefully
examine the tread pattern for signs of uneven or ab ...
Trailer towing tips
CAUTION
On Subaru Ascent models equipped with BSD (Blind Spot Detection) and
RCTA (Rear Cross Traffic Alert), it is recommended to deactivate the "Rear Vehicle
Detection (BSD/RCTA)" function when towing a trailer. The presence of the trailer
may interfere with radar signals, r ...